Pots don’t grow, so eventually our plants require more space or a trim. Repotting is the solution, but it’s a serious operation for a plant, and a poor effort can damage them. Let’s examine how to identify a root bound plant, why it matters, and the best way to repot a plant that is rootbound.
How to repot a plant that is root bound: Gently remove the plant from its pot and examine the roots. Prune and open up the densely packed roots. Choose an appropriate pot, use well-matched soil and repot at the same depth as before, taking care not to overpot.
Read on to learn the step by step process you should take to identify a root bound plant and successfully repot it.
Is Your Plant Root Bound?
A root bound plant is one whose roots have overrun its container. It’s normal to have a few visible root stragglers, but a profusion of roots erupting from the topsoil and drain holes may signal a problem.
The signs of a root bound plant can be non-specific. They include yellowing foliage and stunted growth with smaller new leaves, stems, and flowers. The plant may stop growing altogether and older leaves may drop off.
Since these symptoms resemble signs of overwatering or malnutrition, you’ll have to investigate the root system to make a sure diagnosis. The best way to check is to pop the plant out of its pot and inspect the roots. (See tips below if your plant doesn’t pop out easily.)
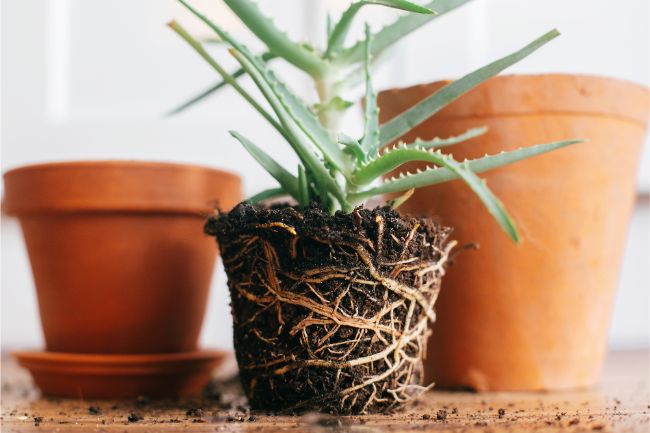
A healthy root ball has a loose network of roots. They hold the shape of their pot and contain an ample amount of visible soil.
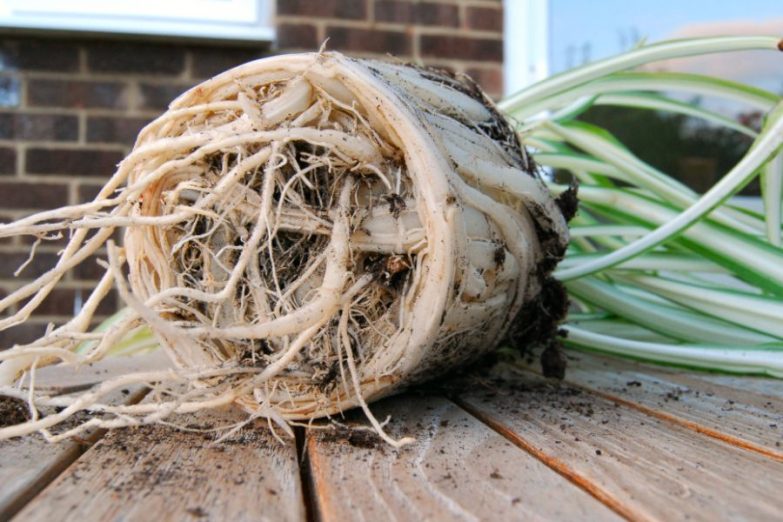
A root bound plant’s root ball is tangled into a dense mat. Long roots encircle the root ball. In an advanced case, most of the potting soil will be gone. In extreme situations, the roots may force the plant out of the pot or even crack the container.
Why Should You Repot A Plant That Is Root Bound?
Being excessively root bound is unhealthy for plants. As the soil is consumed, the plant will become stunted. A root bound plant dries out more quickly after watering, and nutrient uptake is diminished. The stressed roots may start to die. A severe case can essentially strangle the plant.
To correct the condition, root bound plants need to be repotted. This can be into a larger pot or the same-sized container with trimmed roots and fresh soil.
When Should You Repot?
The timing of when to repot depends upon your plant type. Some plants perform well when a bit root bound – they grow better, bloom better, and have fewer pest issues. To some, like African violets, a tight pot seems to remind them of their rocky crevices back home.
Also, you can’t gauge the root system by how large the plant is: some small plants have an extensive root ball, and some big plants have small ones. You have to know your plant.
Remember that repotting is not a decision to be taken lightly. It’s stressful to plants, and you can expect some downtime as the plant recovers and puts out roots in the new space. Some plants, like Bougainvillea, tend to throw a plant fit and languish for months afterwards. Obviously, you don’t want to repot a sickly plant.
Unless you’re using the same mix the plant is already in, the new soil is a sensitive variable. A sudden variance in nutrient levels, pH and composition can shock the plant. The new mix could contain eggs and larvae from soil gnats or other pests.
If you’re on the fence, a good test of whether your root bound plant needs a repotting is to note how long it takes a pot to dry out after a thorough watering. If the soil is dry again in three days, it’s time to move.
Choosing The Right Pot
Pot size is important. If you intend to use a larger container, only go up one size: from one to two inches wider in diameter. Overpotting is a problem because the roots won’t have enough penetration to absorb water from the entire soil area, which can lead to chronic overwatering and root rot.
Consider the container’s material, too. Terracotta breathes and dries out more quickly than a glazed, plastic, or other sealed pot. Match the material to your plant’s preferences.
Also make sure the pot has ample drainage. This can be either several modest holes or a large single one. If you opt for one big hole, you might want to cover it with a coffee filter. A smaller hole probably doesn’t require a screen.
How To Repot A Plant That Is Root Bound
The best time to repot is in the spring or early summer so the plant will have an entire growing season to recover. The plant won’t necessarily expire if you choose another time of the year, but it may be slow to bounce back.
Prepare the new soil beforehand. If you don’t have the plant’s existing mix available, match it as closely as you can. Plants don’t appreciate a quick change of soil.
Water about 24 hours before repotting. This keeps roots flexible and less prone to damage, and it helps the soil hold its shape. Dry soil tends to crumble away from the root ball; sodden soil can sag, disrupt the root structure, and make a mess.
Removing The Plant
Sometimes a root bound plant slides out of its pot easily, but not always. A cramped specimen may need some coaxing.
Anyone who’s seen concrete crack under pressure from underlying roots knows that plants have surprising strength. They can exert a lot of pressure against the sides of their container, and extracting a root bound plant can take some effort.
Start by tapping the pot on all sides. If it’s a smaller pot, hold it upside down with one hand covering the topsoil. Make a downwards throwing motion with the pot to ease the plant out of the container. You can roll a heavier pot while gently tapping the plant out. Sometimes it helps to push the root ball out through the drain holes with your fingers.
If this doesn’t work, do not increase the pull on the plant’s stem.
If the container is flexible, squeeze it in different directions to loosen the root system’s hold. If you’re dealing with a rigid pot, insert a long serrated blade between the pot sides and the soil and slide it around the edge.
If all else fails, you might need to break or cut the pot. Repotting is not for the faint-hearted.
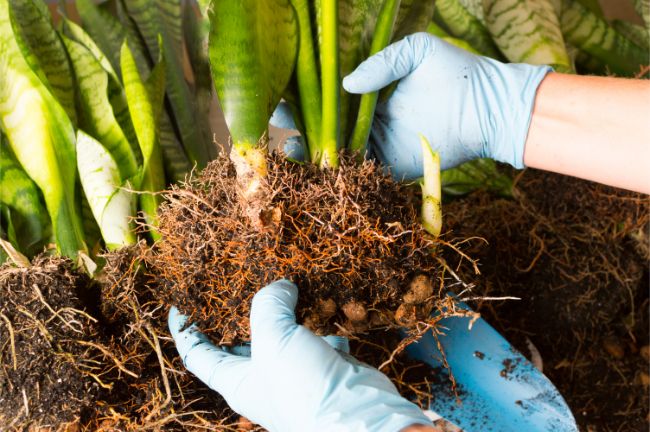
Root Examination
Healthy roots are white- or tan-colored, supple, and smell sweetly of earth. Unhealthy roots are mushy, brown, and foul-smelling: the symptoms of root rot.
Rotting roots are a serious problem; and no, having excess roots doesn’t make it better. Cut out the decay along with any wilted or rotten foliage and repot in fresh soil. Also remove any flowers or fruit growth. If you’re forced to trim a significant amount of the roots, cut the foliage back so the smaller root system can support it.
Handling The Roots
Light surgery may be necessary to repair a root bound condition, but it’s okay. Removing a portion of the outer roots won’t traumatize a healthy plant. The goal is to allow the root system to expand and take in nutrients from new soil.
A mildly root bound plant may only need to have the circular roots cut and the rest untangled … a dense mat of roots might require a complete trim.
Adapt these steps to the plant’s situation:
- Cut the roots circling the system short. They can strangle the other roots. Make sure the blade has been sterilized: a quick dip in Isopropyl alcohol works fine.
- Use a sharp knife or pruning shears to shave the thickly knotted layer of bottom roots from the root ball.
- Give a heavily root bound plant a chance to escape itself by making vertical slices in the lower third of the remaining root ball … make three to five cuts spaced evenly around the circumference.
- If there’s a very thick tangle of roots on the sides, shave off the outer layer.
- To let the roots grow into new soil more readily, use your fingers or a forked tool to gently untangle them along the sides and top of the soil ball.
- Cut back the foliage relative to how much of the root system you’ve removed. Fewer roots means less support for the rest of the plant, and its resources will be needed to regrow the system.
Root Pruning To Maintain Size
Your plant may already be the size you like … or perhaps you simply don’t want a larger container. In this case, you can treat a root bound condition by pruning the plant’s roots.
Using a sharp, sterilized knife, cut up to a third of the root system from the bottom. Slice a half-inch around the outside of the root ball. Repot in the same container, or one of the same size.
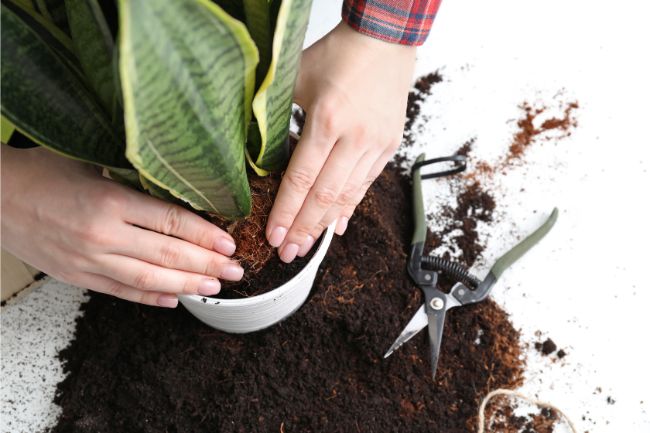
Refilling
Put a layer of soil on the bottom of the pot to replace the roots you removed. Center the plant within the pot. The soil line should be about an inch from the rim. If the plant is too low in the container, remove it and add more soil to the bottom – don’t add more soil on top.
Fill in the sides with fresh mix. Gently tamp the soil in to remove air pockets, but don’t press too hard and make it overly compact. It should be firm but fluffy.
Water thoroughly. This helps the soil settle around the roots: add potting mix to fill in any sunken spots that develop.
Aftercare
Give your plant some TLC while it recovers from repotting. Put your plant back in its familiar location, but shield it from hot sun for a few days … or weeks. Plants vary in how long they take to recover, depending on their resiliency and how much trimming you needed to do.
Watch the soil and water carefully. The mix may take a different amount of time to dry than it did before—you don’t want to drown the struggling roots or let them dry either. A light mulch can help the soil stay moist.
Hold off on fertilizer during convalescence. New roots are sensitive to burning, and they don’t need a shock while re-acclimating.
Restart normal care once you see new growth.