Houseplant propagation is one of the most fundamental and enjoyable aspects of indoor gardening. This rewarding activity requires knowledge and skill – it’s a science and an art. In this article, I’ll explain everything you need to know to propagate houseplants and multiply your collection.
How to propagate houseplants: Most plants can be propagated by many methods. Sexual reproduction through seeds and spores varies genetics; vegetative propagation creates clones. Most houseplants are grown from daughter plants or stem, leaf, or root cuttings. Air layering is often the fastest way to produce large, healthy plants.
Propagation Overview
Most plants can reproduce by either vegetative or sexual means. The variety of ways to propagate houseplants truly demonstrates nature’s abundance.
The most familiar method is through seeds and – a little less commonly known – spores. These forms use sexual reproduction to combine genetics from individual plants of the same species.
The second type of plant reproduction, vegetative, creates an exact duplicate of the parent plant. Separation of plantlets is an easy, common method. Many plants can also replicate vegetatively through stem, leaf, or root cuttings.
While you can use seeds to grow most houseplants, it is generally a slower process and one that, due to genetic variability, may not produce the plant you want. Many hybridized cultivars must be vegetatively propagated to retain their characteristics and uniformity. The downside is that vegetative reproduction also replicates genetic weakness and can increase the danger from pests or disease.
Rules Of Propagation
Nature plays a numbers game with plants: it doesn’t coddle every seedling. To avoid wasting time and effort, growers seek to bring these natural losses under control by providing the right conditions for plantlet survival. No one can achieve 100% success, but we can increase our odds.
The number one problem is rot. There’s a balance to maintain—plantlets, cuttings or seeds need consistent moisture to avoid drying out … but overly wet conditions lead to a pathogen boom. A proper, consistent level of moisture gives baby plants the chance to survive this tenuous stage.
Each plant has different requirements, so you’ll need to research the best treatment for your species. Here are common elements to help you achieve the best results:
Sanitation
All work areas should be free of pests and disease. Young plants are vulnerable to pathogens and don’t have the ability to withstand a microbial assault.
- Tools, planting trays, and other equipment can be sterilized by washing with a 1:9 mix of bleach to water.
- Use only sterile propagation media.
- Make sure the parent plant is clean and free of pests or disease.
- Take cuttings from young growth at the top of the plant.
- Clean seeds after collection.
Proper Environment
The environment is critical to propagate houseplants successfully. Here are the important factors:
Humidity – Cuttings, seedlings, and offsets don’t have a sufficient root system for the uptake of moisture, so the ambient humidity must remain high so they can stay well hydrated. High humidity not only keeps cuttings from wilting, but it also helps maintain consistent soil moisture.
One method to create humid conditions is to invert a plastic bag over the plants. A plastic bottle with its bottom cut off is another possibility (leave the cap on). A tented tray is useful for a larger number of cuttings. Mist periodically to maintain humidity; add water when the sides stop fogging up.
Water – Once you’ve moistened the growing media, you shouldn’t need to re-water until roots appear. Overly wet soil is probably the biggest cause of propagation failure. The humidity tent you provide should maintain the moisture level.
Temperature – The ideal air temperature is 55ºF (13ºC) – 65ºF (18ºC), with a soil temperature of about 10 degrees higher: 65ºF to 75ºF (24ºC). Exceeding 75°F can increase the growth of harmful pathogens.
Many new plants don’t require their soil to be warmer than the surrounding air to grow, but it replicates natural conditions and can increase yield. It also improves rooting success with more difficult species. Special waterproof heating mats for seedlings are available.
Light – Cuttings should be kept out of direct sunlight or any overly intense light until they’ve grown a root system. They don’t need much light to produce their first roots. North-facing windows or fluorescent grow lights are the most reliable way to provide the gentle source a new plant needs.
Allow cuttings to develop a root system before transplanting. This typically takes six to eight weeks. Some plants take longer. One way to test if rooting has started is to tug very gently: resistance indicates roots.
Once your new plant has rooted well, it can be hardened off to normal conditions by periodically opening their closed environment to the outside air. Decrease the intervals between ventings until the plant tolerates a normal atmosphere.
Planting Media
The ideal media to propagate houseplants needs to be sterile, chemically inert, well-draining, and have enough structure to support the growing plant. Young roots need easily available water and oxygen, so the composition of the mix makes a huge difference.
There isn’t a one-size-fits-all solution, of course. Customize the soil composition to match your plant’s requirements.
Here are commonly used rooting media:
Sand/Pumice: This is a heavy material, but it works because young roots can easily penetrate it and be well anchored. They are neutral and can’t absorb nutrients; both are easy to sterilize by heating. Sand is especially inexpensive and easy to find.
Peat /Sphagnum moss: Peat and sphagnum moss come from the same plant, but peat is an older, decomposed form that contains other (dead) material and is a bit acidic. Both hold water and make a good propagation media. Milled sphagnum moss is more expensive, but it has a neutral pH and is more sterile. One popular recipe is a 50-50 mix of peat and perlite, which gives the soil a well-aerated and strong structure.
Vermiculite: This organic material is very light weight and absorbs a lot of water. It can hold some nutrients. Note: Only use a horticultural grade.
Perlite: This lightweight medium holds up to four times its weight in water. It’s inert, sterile, neutral, and doesn’t hold nutrients. It also increases aeration.
Another popular and convenient method is to use rooting cubes. These contain a foam-like medium that retains water while holding more oxygen than standard soil mixes. The material is organic: chalk and basaltic rock. They are inert and sterile.
Fertilization
You won’t need to fertilize a new plant until its roots have begun to develop and they’ve grown their first true leaves. They only need water, light, and warmth up to that point. Too much fertilizer can burn their tender roots.
It’s true that, because most propagation media is sterile and infertile, you’ll eventually need to fertilize. Don’t rush it, though: you want the new plant to concentrate on growing roots rather than foliage. When you do fertilize, dilute to 1/4th strength and apply lightly.
Rooting Hormone
Though rooting hormone can stimulate recalcitrant plants into producing roots, you don’t necessarily need it. Tropical houseplants with soft, fleshy stems can usually go without.
Always check the “use by” date: rooting hormone tends to have a rather short shelf life. Be conservative in the amount you use and follow the manufacturer’s instructions.
Vegetative Propagation
Growing these genetic copies preserves characteristics of the mother plant which can otherwise be lost or muted by sexual reproduction. With vegetative propagation, you can be sure to get the same variegation, color, leaf shape, etc., of the original.
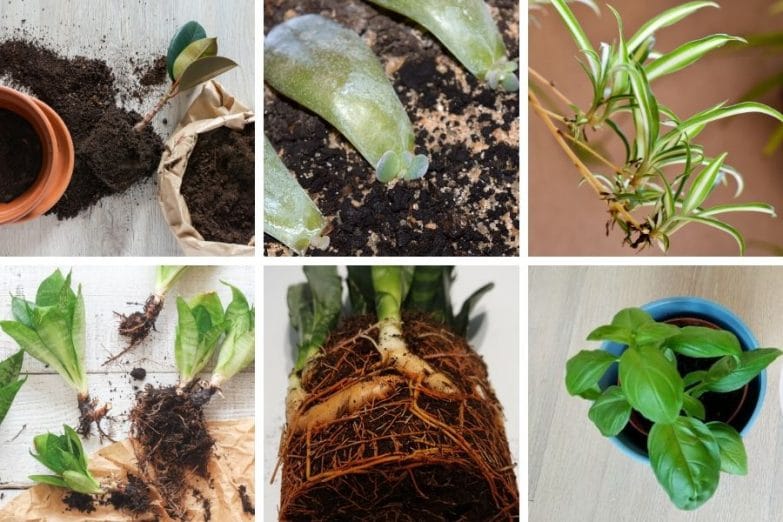
Separation
The easiest way to propagate houseplants is to simply detach and replant babies naturally growing on the mother plant. These daughter plants are genetically identical clones.
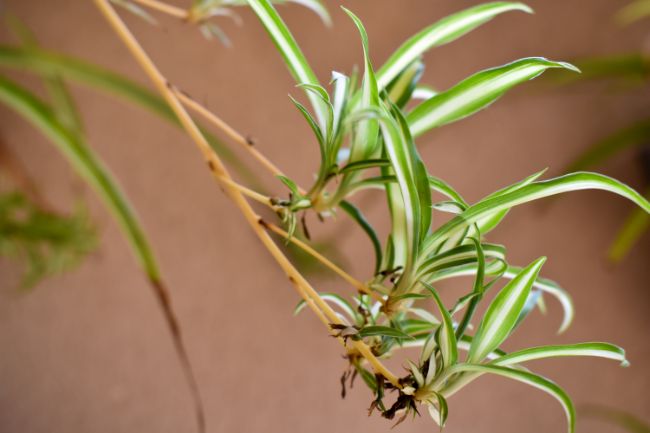
These plantlets can grow from root structures like bulbs and corms, or they can pop out at leaf margins or stems. Not every plant reproduces this way, but many do: these include many bulb and corm species, cacti and other succulents. The Spider Plant is a famous example.
Repotting is the best time to propagate houseplants by separation. Here are the basic ways a plant can propagate by this method:
Offsets and Suckers – Offsets and suckers are small, complete baby plants that grow from the roots or stems of their parent plant. Most grow near the base of the parent plant, but not all.
Some succulents grow offsets on the tips or margins of their leaves. The ring of myriad new plantlets on the leaves of the mother of thousands (Kalanchoe daigremontiana) is its highlight feature. Strawberries produce new plants from above-the-ground runners. Tiger lilies even produce mini-bulbs called bulbils in their leaf and stem joints.
Once these baby plants have developed roots, they are ready for transplanting. (Actually, they will often grow roots in moist soil anyway.) In most cases, water the parent plant the day before separation to ensure well-hydrated pups. Cacti are a little different: let their offsets dry for a couple of days before planting.
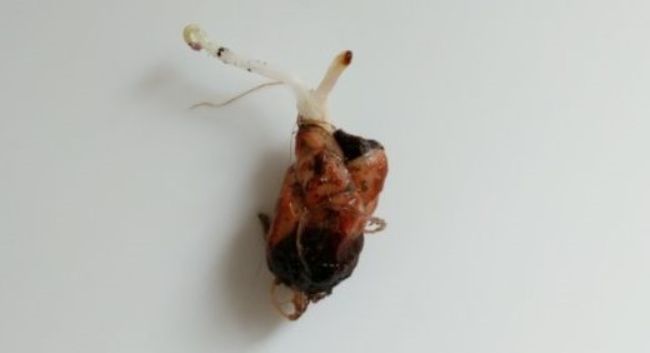
Bulbs and Corms – These underground structures are a classic source of vegetatively produced babies. Each offset that grows from these root structures can be separated into a new potential plant. In fact, if these offsets are not separated, they can eventually overcrowd their parent with multiple stems and reduce flower production.
The best time to separate bulbs or corms is at the end of their season after the foliage has turned yellow. Dig the plant up and cut the leaves to a few inches above the root. Remove the bulblets or cormels and replant at the same time you normally replant the mother. They usually begin blooming in about two years.
Scaling – This method is useful for multiplying bulbs that have fleshy storage tissue that divides into what are called scales. Lilies and fritillaries are examples. Each scale can produce a new bulb.
The scales are pulled off close to the bottom growing plate of a turgid, fresh bulb (or cut from a soft one) and covered with fungicide. The scales are placed in a plastic bag using a mix of one part scales and four parts of a damp sterile planting medium. Blow into the bag to expand it, close it with a tie, and store in a warm place. In six to eight weeks, new bulblets should begin to form on the broken base surface of each scale.
Division
Division is another vegetative method to propagate houseplants to produce clones. It involves cutting roots or crowns into pieces to make new plants. Plants that form clumps of multiple stems or have a rhizome or tuberous structure can be propagated by this method.
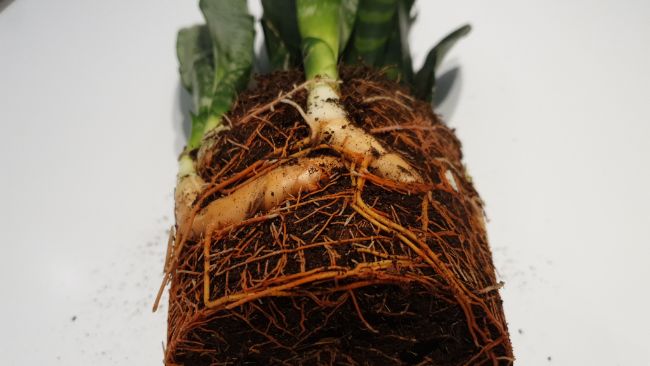
Rhizomes – These thick underground modified stems grow horizontally, sending out shoots and roots from its nodes. Calla lilies, Snake Plants, and Cast Iron Plants all grow from rhizomes. Without division, the original plant can become crowded and its older, center rhizome can die.
The best time to propagate houseplants by dividing a rhizome is usually in either spring or fall, but it varies by species. Dig up the rhizome and divide it into sections that retain two or three nodes each. Replant near the surface, covering the root structure with an inch of soil.
Tubers and Tuberous Roots – These thick underground structures look similar, but tubers are modified stems and tuberous roots are, well, roots.
The difference as far as propagation goes is that tubers are usually easy to cut apart and plant with “eyes” or buds contained in each section. Tuberous roots are likely to have their growing buds gathered near the top of the stem and must be divided more carefully.
Potatoes are the most famous example, but Peonies, Dahlias, Begonias are others. Both types of structures can be divided either after the growing season or before replanting—just be sure to store them safely where they won’t freeze or rot.
Tubers often have eyes scattered over the surface. You can grow new plants by cutting and planting sections that have one or preferably two eyes apiece.
Tuberous roots usually have their growth nodes on the stem near each tuber’s neck. When dividing, you must ensure there is at least one “eye” on each section or it won’t grow. The eye is near the stem and can be hard to see, so some growers wait until the plants begin to exit dormancy to be sure.
Coat the pieces with a fungicide after dividing the tuber. Let the sections dry for a few days in a warm space before either planting or storing them.
Crowns – Division is a straightforward method to propagate houseplants with multiple stems. Timing is important: the individual sections need to develop a healthy root system before blooming or dormancy. Divide spring-flowering plants after blooming and fall-flowering plants early in the season.
After digging up the plant, spray its rootball clean to make it easier to work with. Discard dead material. Either pull the roots of individual plants apart or, if they are tightly clumped, cut vertically through the mass with a sharp, sterilized blade.
Replant the new sections in soil at the same level as their previous planting. Water thoroughly and keep the soil slightly moist until the new plants are established.
Stem Cuttings
Stem cuttings are a very popular method to propagate houseplants that works with many plants – from Asters to Zinnias. Cuttings can be made year-round, and a new batch is produced every time you prune.
Cut a quarter-inch below a node with a sharp, sterilized blade. Tips are usually ideal. Remove the leaf that’s growing from the node, and keep two or three leaves on the top portion of the stem. The cutting should be from two to six inches long depending on the plant. Make sure your chosen stems are healthy and pest-free. Young stems that aren’t flowering are best.
It’s important that the cutting not be allowed to wilt or dry out. Though it’s not always necessary, many growers dip the stem’s end into rooting hormone to speed the process.
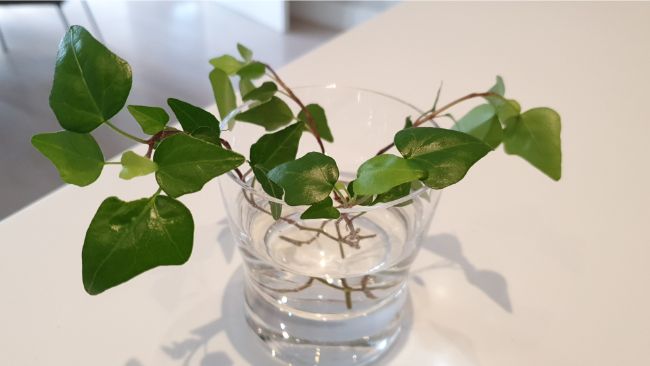
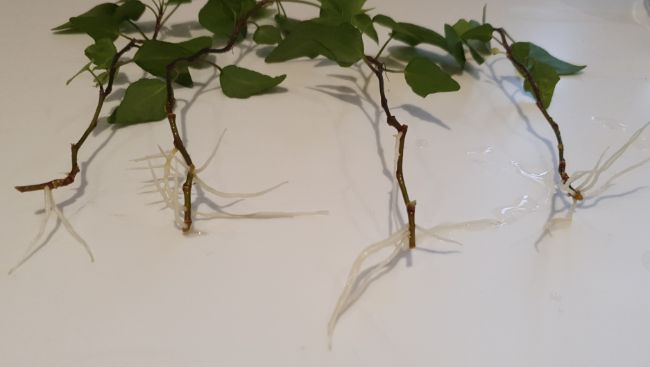
There are two basic ways to propagate houseplants by stem cutting: placing it in water to grow roots, or skipping the water step and inserting the stem directly into soil.
Water Method – The big advantage of putting a stem in water for roots to form is that it prevents wilting. It works fine for some plants, like pothos and coleus, but water-grown roots don’t always function well in soil. The cutting must produce more new roots when finally transplanted into soil.
Soil Method – The advantage of planting a cutting directly in soil is that the eventual roots are suited to the medium. It also allows you to use rooting hormone. Simply poke the stem into soil, or make a hole with a pencil and drop the stem into it. Insert just deeply enough for the stem to stand. Firm the mix around the cutting and water thoroughly to close air pockets in the soil.
If you’re dealing with a thick stem, as from a Dieffenbachia or Dracaena, remove the leaves, lay it horizontally on the soil, and push it down slightly.
Leaf Cutting
Some houseplants can grow new plants from a leaf with its stem (petiole) or even just a part of a leaf. These cuttings can generally be taken at any time, as long as the leaf is healthy and free of pests and disease.
Examples of plants that can be successfully propagated by leaf cuttings include Begonias, African violets, Jade plants, and Snake plants.
Different parts of the leaf may be used:
- Leaf-Petiole – This type includes both the leaf and its petiole. The stem is inserted into the medium for roots to form. This method is useful for African violets and Peperomias.
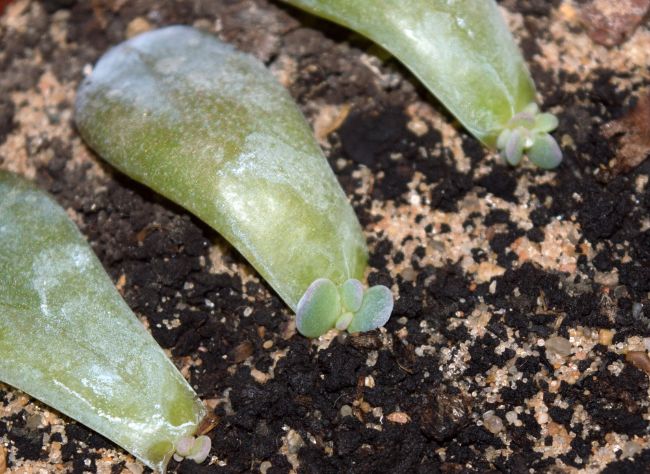
- Leaf-Blade – Many thick-leaved succulents, including Jade plants and Begonias, can be propagated with only the leaf. It’s inserted vertically into the soil with most of the leaf above the surface. Roots form along the leaf’s base.
- Leaf-Vein Cuttings – In this method, several slices are cut perpendicularly across the major leaf veins. The leaves are placed flat on the soil, top side up. Roots or baby plants grow from the cuts. Begonias are often propagated this way.
- Leaf-Section Cuttings – Some plants have long, narrow leaves that can be cut into 2-inch sections and placed vertically into the soil. It’s important to keep track of the orientation, or polarity, so the top portion of each segment is pointed upward. Snake Plants propagate well with this method.
Root Cuttings
Root cuttings don’t work on every plant, but it’s handy when it does. It’s suitable to propagate houseplants that produce new shoots from their roots, such as phlox, roses, and lilacs. The process doesn’t require intensive aftercare and the new plants are generally robust and free of foliar pests or disease.
It’s best to take root cuttings while the plant is dormant, usually from mid-autumn to early winter. The plant won’t depend as much upon its root system at that time, and they will contain stored energy.
The cutting should be two to six inches long for large roots or one to two inches if small. Two cuts are made: one close to the crown (proximal) and one further away (distal). The sections should be planted in the same direction as they grew. Note: To identify the cuts, make the proximal incision straight across the root and the distal cut at a slant.
Store the root cuttings for three weeks in moist, sterile peat moss or sand; then plant as follows:
Large Roots – Plant a couple of inches apart. Bury the root two or three inches from the surface with the proximal end on top.
Small Roots – Place the cuttings flat on the soil in a planting tray and cover with ½ inch of light media. Encase the tray in a plastic bag; alternatively, cover it with a pane of glass.
Shade the cuttings until you see new shoots, then remove the protective covering and gradually increase the light.
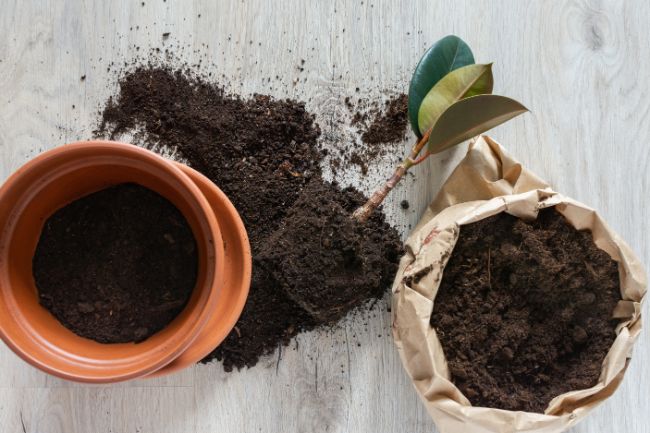
Air Layering
Though it requires a few more steps than propagating by separation or cuttings, air layering can more quickly produce new plants that are larger and stronger than that of any other method. Also, it has no adverse affects on the mother plant.
It takes a bit more effort to propagate houseplants by air layering, but it also yields better results with many difficult-to-root plants. It is commonly used for Azaleas, Camellias, Roses, Scheffleras, and ornamental Ficus species.
This method works by treating the stem so that the downward movement of nutrients is impeded. The result is a buildup of material at the point of layering to stimulate root production. The stem is wrapped with damp moss to exclude light and retain moisture around the layered site. Once grown out, the root-bearing stem portion can be removed and transplanted.
Materials Needed:
- Rooting hormone
- Black plastic
- Tape or twist ties
- Sphagnum moss
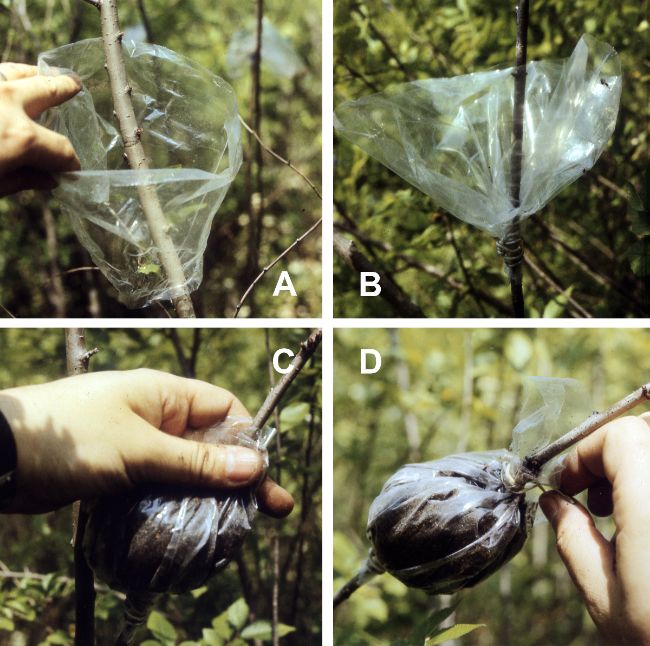
Air Layering Steps:
- Select a healthy stem and remove a strip of bark from around its circumference. Begin by making two girdling cuts on the stem an inch or so apart. The incision should go through the bark deeply enough to make it possible to peel away the top stem layers between the cuts.
- Scrape away the cambium layer which lies directly underneath the green phloem. Scrape down to the underlying woody material.
- Coat the exposed area with rooting hormone.
- Wrap the site with sphagnum moss. Apply a small amount of rooting hormone to the moss before pressing it over the exposed section.
- Cover the area with plastic to hold the moss in place and maintain moisture. Close the ends with twist ties or tape.
Roots should begin to form within a few weeks, but some plants take longer … some may take months. Once enough of a root mass has developed, sever the branch an inch below the layering site and replant.
Note: Use a small pot so that the mix doesn’t stay too damp. You don’t want to encourage rot!
Sexual Reproduction
Seed Propagation
Seeds are, of course, well-known propagators; however, they’re more commonly used in vegetable gardens and flowerbeds than to propagate houseplants. Though the basics of the method are well known—plant in soil and add water—there are techniques that increase yield.
The most important factors are to use high-quality seeds and to keep them evenly moist (but not wet).
Sow in pre-moistened media; sterile soil helps avoid disease. Plant seeds at the recommended depth: usually one to two times the seed’s diameter. Avoid crowding, which causes spindly stems and slower growth. Cover with light material and water to settle the medium. You can scatter very small seeds over the surface and water in.
The planting tray should be sealed with plastic wrap or a glass cover. If you use a plastic bag, provide reinforcement in the way of a chopstick or bracket to keep the cover from collapsing onto the sprouts. Raise the cover as the emerging sprouts grow.
Seeds vary in their needs, so research the specific conditions needed for your plants to germinate.
Two useful methods for mimicking the natural environment are stratification and scarification:
Stratification
This process replicates the conditions a seed naturally experiences before germination. Usually this means giving the seeds a cold storage period for one to three months in a moist environment. The typical ideal temperature is just above freezing, about 34ºF (1ºC) to 37ºF (3ºC).
A mix is made in the ratio of one part seeds to three parts damp perlite, builders sand, or vermiculite and placed in a sealed plastic bag. The mix should be damp but not moist. Soaking the seeds in cold water for six to twelve hours just before bagging may shorten the stratification period, but check your seed specifications first.
Once the seeds have been stored for the necessary time, remove and sow as usual.
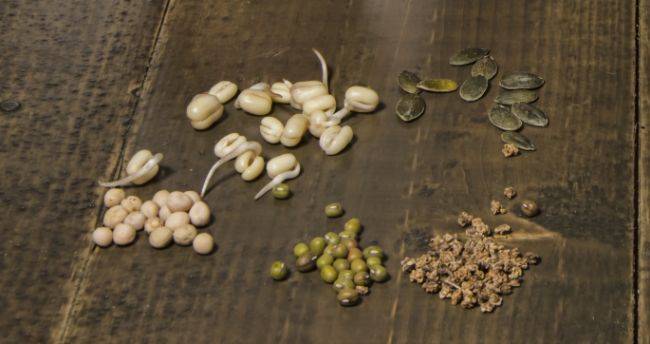
Scarification
Some seeds are impervious to the air and moisture they require to germinate. Scarification softens or opens the seed coat.
Mechanical – Hard seed coats can be abraded to weaken the coat’s natural barrier. Small seeds can be rubbed between pieces of medium sandpaper; larger seeds can be scored with a nail file or gently nicked with a blade.
Thermal – This method entails dropping seeds into four or five times their volume of water and heating it from 170ºF (77ºC) to 212ºF (100ºC). The water is removed from the heat source to let the seeds soak in the cooling water. Most seeds should soak for 12 to 24 hours and then be sown regularly; check your plant’s guidelines.
Chemical – Some seeds respond to being dipped into alcohol, acetone, or sulfuric acid to replicate the chemical process of being digested by animals in the wild. It’s not a method commonly used by residential growers.
Spore Propagation
Ferns propagate through spores instead of seeds. These are contained in small cases under the leaf frond called sporangia; they come in bunches called sori.
You can buy the spores or collect them from live plants. Be aware that spores are hard to visually identify, so there is a little greater chance of mistaken identity than when purchasing seeds.
If you want to collect spores, harvest when the sporangia are plump and slightly hairy. Simply put a healthy frond in a plastic bag and let it dry, and then shake the bag. You should see the spores settle on the bottom.
Sprinkle the spores over a planting mix in an unglazed pot, and set it in a saucer filled with water to wick into the soil. Put the pot inside a plastic bag and place it in a sunny, warm location of 65ºF (18ºC) or higher. It takes longer for spores to germinate than most seeds. The first sign will be a green, slimy coating growing over the surface of the peat. Over the successive months, you’ll see baby fronds sprouting from the green film.